I
find I don't have to work as hard playing hockey with sharp skates. I
don't have to wonder whether an edge will hold when I'm making a sharp
cut or a quick stop, and I don't have to adjust my skating style and my
moves to compensate for a bad edge. Unfortunately the cost for skate
sharpening keeps going up. I think its close to $10 now depending on
where you live. I'm not sure since I can't remember the last time I
paid to have my skates sharpened. About 20 years ago I looked around my
shop for parts for building my own skate sharpener. I used to work at
an ice arena sharpening skates, so I knew what was needed. I knew I had
to buy a grinding wheel designed for skate sharpening and a diamond for
dressing that wheel. I needed a mount for that diamond and a mechanism
for adjusting the curve of the wheel. That curve controls the hollow on
the skate blades. Actually the physics of skating is fascinating. That
slight hollow in the blades creates an enormous pressure that turns the
ice into a slippery quasi-liquid under the blade. I used to
experiment with the depth of those hollows and the radius off the
blades, but that's another story.
Another critical
component was the skate holder. Every year or two, I wonder about
buying one from the same company I bought the grinding wheel and the
diamond from. Every year I put it off thinking the holder I built out
of a furniture clamp, a piece of plywood and some felt is good enough.
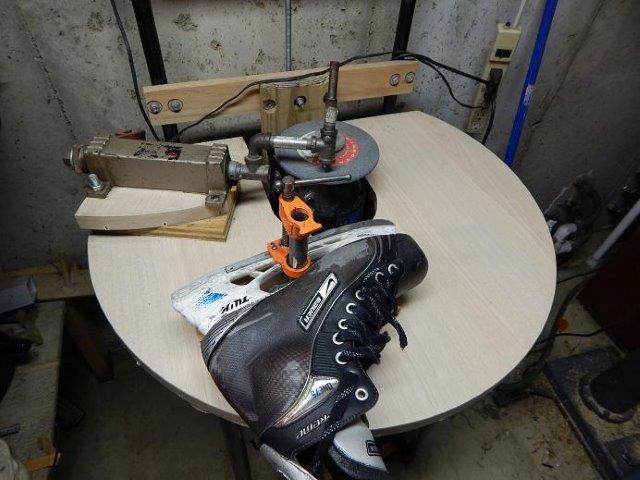
I bought some 1/4" square steel rod and mounted one 6" piece of it to the
furniture clamp with small screws as you can see in the above picture.
I tapped the steel rod so the screws do not touch the skate. I took
another 6" piece of the 1/4" square rod and mounted it on a piece of hardwood
which was mounted to the plywood with screws and glue. I then glued on a
thin piece of felt cloth under the plywood so that it could slide
smoothly on the table.

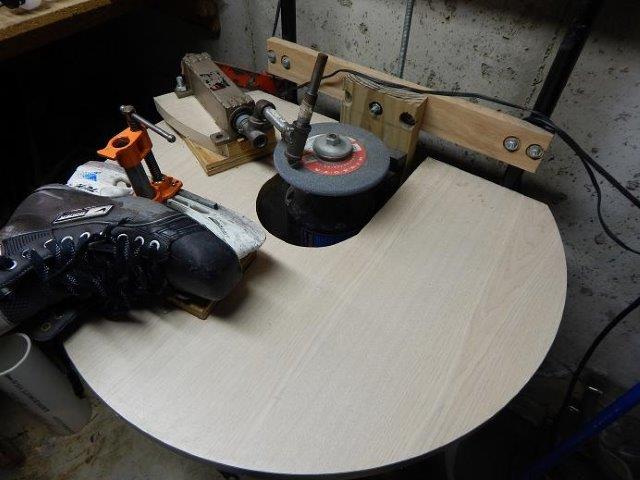
I acquired a 30" diameter round table top from a discount hardware
store for about $20 and a regular grinder motor for about
$60. I cut a slot in the table for the grinder motor and made a straight cut
along the back. I made an H-mount out of wood for the grinder so that I could raise
and lower the grinding wheel with respect to the table by loosening nuts shown on the top part of the H in the picture.

I bought some 3/8" steel pipe fittings for making the mechanism for
dressing the stone. I already had an axle bearing mount which was used
for a table saw. I mounted it so that it could swing along the table.
The diamond which is mounted on a steel rod can slide in and out of the
steel pipe T. I drilled a hole and tapped it so that a set screw could
be used to hold the diamond rod in place. By swinging the axle bearing
and sliding the diamond rod, I could control the curve on the stone and
thus the hollow on my skates. To dress the stone, I hold the diamond
rod and rock it up and down.

The path of the diamond as it rocks back and forth across the spinning wheel has to have a very close tolerance to properly curve, that is dress, the stone.

Here
is a better picture of the holder showing the piece of hardwood tightly
bolted to the plywood. The 1/4" square bottom rod that comes in contact
with the bottom of the skate blade is just out of sight. The
furniture clamp holder is attached to the plywood with a threaded pipe
flange.

Here is the bottom 1/4" square rod and the post flange.

The
pipe fits through the hole in the Tuuk plastic part of the skate and
the upper part of the furniture clamp is screwed down onto the threaded
pipe. The crank is then used to firmly clamp down the skate.

The
table itself was made out of black iron pipe. The bottom part of the H
which holds the grinder can be seen here. The grinder height can be
adjusted by loosening 8 nuts attached to 4 U bolts which firmly hold
the H in place. Once adjusted, the sharpener doesn't have to be
readjusted. I haven't readjusted the grinder height in 20 years. I did
add a threaded rod to the center of the H and goes up through the top
shelf shown here. By turning a nut on the threaded rod above the shelf,
I could precisely control the height of the grinder.
As with many of my projects and prototypes I eventually get them to a point where they work well. This is one of those. I haven't had to do anything to this skate sharpener in 20 years. I only sharpen my skates, so I've never had to change the wheel or the diamond. Having said that, I'm sure a skilled do-it-yourselfer could make some improvements to this design.
As with many of my projects and prototypes I eventually get them to a point where they work well. This is one of those. I haven't had to do anything to this skate sharpener in 20 years. I only sharpen my skates, so I've never had to change the wheel or the diamond. Having said that, I'm sure a skilled do-it-yourselfer could make some improvements to this design.